twofer DIY post--cake and travel mug!
I swear this is my last DIY post for a while as seeing I'm going back to school in few days (see my previous post about the road trip)! I did two completely different DIY posts in the last few weeks. The first one I couldn't blog until it was completed, some kind of a secret mission if you would call it! ;)The first DIY was a surprise for my boyfriend who was going back to Rochester, I decided to give a cake in the jar a try! Hence the reason why I couldn't blog about this until he got the package. I got the ideas from Pinterest, just search "cake in jar" and you'll get tons of results. It was both a success and a fail with my cakes. Success--surprise mission accomplished! Fail--not enough cake batter in the jars.
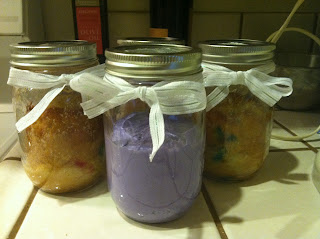
I decided to whip up a full batch with Pillsbury's Funfetti cake, because I wanted some cake for myself...duh? I got my jars from Michael's for like a dollar something each. I got four, because I'm extremely nice--my roommates were in Rochester too so, I mailed the boyfriend extra jars so he could share and have one to himself. I made three cake jars, and the other one was for frosting.
I filled it only up to 1/4 of the jar, I probably should have put a little more, see below picture for why I should have....
People on Pinterest were saying those cakes sealed would last around two weeks unopened, but I was hesitant about that....because I don't think anybody would want to leave a cake in their refrigerator for two weeks, I mean, come on.
While the cakes were baking, I had my mom made some of her delicious frosting (I can't and won't share the recipe, no matter how much you beg!) and we dyed it purple for Taylor's obsession with Washington Huskies, unfortunately it wasn't purple enough--but purple is purple to me. :)
Long story short, the shipping costs were more expensive than I expected, but I mailed it away....to a boyfriend who didn't check his mail box for God knows how long. I mailed it on Wednesday, it was supposed to arrive Friday, but by Tuesday I had to let Taylor know that there was a package out there waiting for him to claim it. He checked his mailbox.....yeah. But when he opened it up, he said it tasted like it was recently baked and the frosting was amazing. I made him refrigerate it for a while before eating, though. Successful surprise!
Definitely gonna do this cake in jar again for someone who is far from home!
The next DIY I did was to fancy up my Starbucks travel mug, because silver and black is nothing without some... glitter! I was stumbling around Pinterest, yes I know--I spend too much time on there, and I saw someone glittering their Starbucks cup. Instant inspiration! I had almost everything at home waiting for another DIY!
Travel mug, Aalene's Jewel-It glue (it was all I had and the home made ModPodge I attempted to was too watery and runny, FAIL), glitter (I don't know where these came from and I've had them for long time stashed away) and an old toothbrush.
This was the Starbucks travel mug I had, it has some kind of plastic see through thing that you could write on and slip inside the clear case for display, I decided to get that out and just throw it out. I did this directly on the clear case.
I applied a generous amount of glue and spread it around with the old toothbrush. I washed the toothbrush out and plan on using it for other glue-y things in the future!
I used almost all the mini-jar of glitter, some of it was wasted in the home made ModPodge incident but we won't talk about that ever again... I swirled some glitter in sections and sections until I covered it all, you can see the plastic thingy I was talking about is finally coming in handy now! Glitter catcher and flexible enough to funnel up and pour back in the case to recover some spots. The spots that I missed I just dabbed my finger with glue and glitter and went over the area.
By then, Ani was bothering me for attention, and I had to let the glue dry...I left it on the table for around 24 hours. On to the cat!
Dressed him up in some cute jewelry, of course he wasn't too happy, can't you see it in his face?!
Lookeee here! Now how awesome will I look around the campus carrying this?! FABULOUS! :D


Thank you for leaving a comment! I look forward to read what you've just said and I will respond in a couple of hours!